Block Printing on Fabric: A Complete Beginner’s Guide
1. Introduction
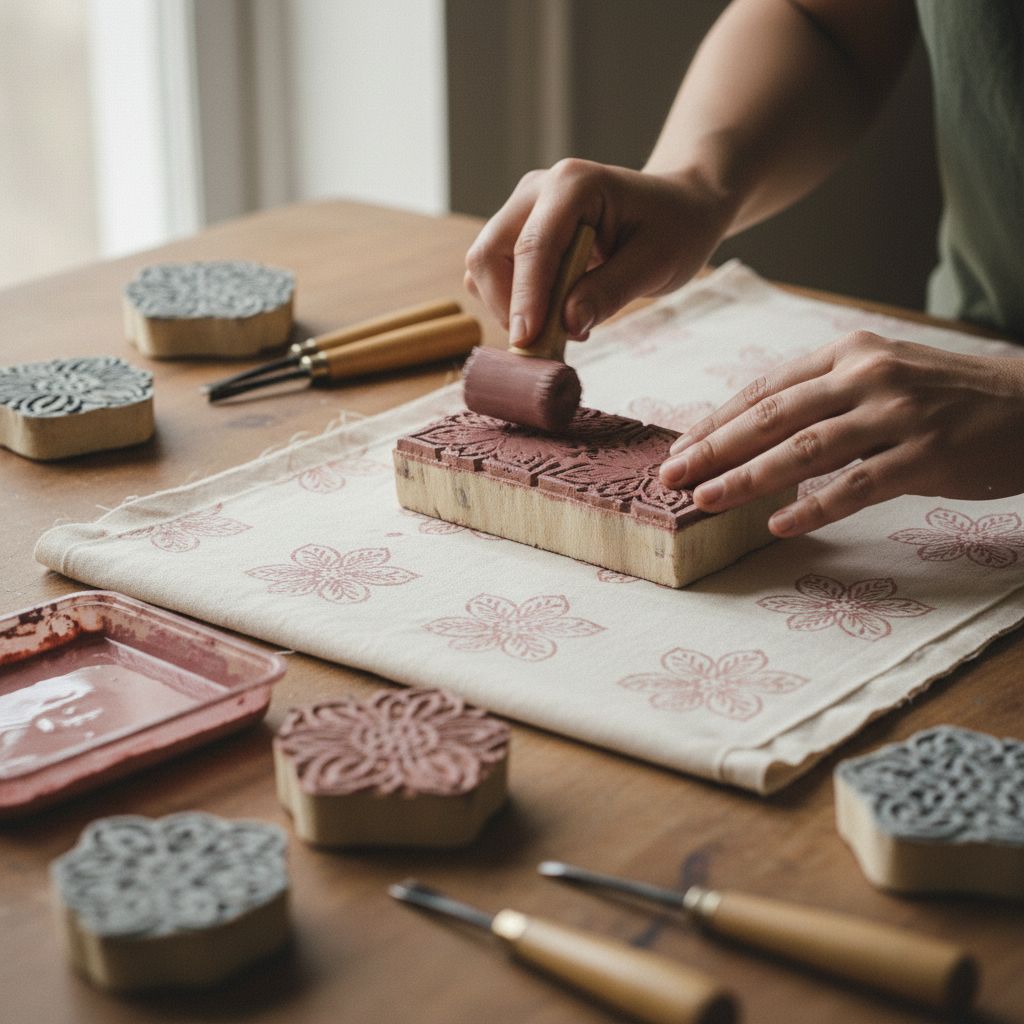
Block printing on fabric is a simple, hands-on way to turn plain textiles into something unique and special. You carve or choose a raised design, coat it with water based fabric paint, then press it onto cloth to create repeat patterns, borders, or bold single motifs.
It helps if you place some foam underneath as you press the blocks, This adds depth, and prevents paint going everywhere.
It is fun because it is very physical and immediate: you roll the paint, press the block, lift it, and your design appears. You can use brushes, foam pieces or rags to put the paint on the blocks, even rollers!
It is versatile because you can print on almost any fabric, from linen and canvas fabric to make cushions or scarves.
You cant print on fleece, or silky textured fabrics as the paint wont take to that.
In this post you will understand the process with the tools, how to design and carve a basic block, how to print cleanly, and how to set your prints so they are washable and long-lasting. You will be ready to get creative with block printing.
2. What is block printing on fabric
Block printing is one of the oldest printmaking methods in the world. It has been used for centuries in places like India, China, and Japan, and pakistan to spruce up fabric. Traditionally, artisans carved detailed patterns into wooden blocks, then stamped them repeatedly across long lengths of fabric.They also used vegetables like potatoes.
The basic concept is simple:
You have a raised surface (the block) that carries the design.
You apply ink or paint to the raised areas.
You press that onto fabric to transfer the design.
Any hard survace that you can carve will work.
Where the block is raised, the color prints. Where it is carved away, the fabric shows through. Repeat the process, and you build patterns and textures. The technique has remained almost unchanged for hundreds of years because it works so well and does not need expensive machines, or even highly skilled individuals.
It is a must to wash your fabric before applying the block printing.
Also once you have done the printing, you must leave for 24 hours preferably, then iron on the reverse side of the fabric before sewing and making your project, and indeed washing.
3. Tools and materials you need
Most tools needed for block printing are easy to find, and quite cheap.
Blocks
Your block is the stamp that holds your chosen design.
Wood blocks
Wash thoroughly after each use.
Durable and good for many uses.
Available pre carved, since carving hardwood is more time consuming.
Look for “wood block printing stamps” online or in craft stores.You can buy kits.
Linoleum blocks (lino)
Smooth surface and good for fine detail.
Require sharp tools and some pressure to carve.
Great as a more advanced step. Quite hard to carve a shape.
Just draw then carve, quite tricky for beginners.
Vinyl blocks
Easier qucker and safer to carve than lino, better for beginners.
Works well with fabric inks.
DIY options
Craft foam sheets: Cut shapes from foam and glue them to a firm backing (like a piece of cardboard, acrylic, or wood). Great for bold, gives a nice effect.
Potatoes or other vegetables: Fun for a one off project. Carve a simple shape into a cut potato, but remember you cant keep them, you simply discard them after every use.
Tip: Start with soft carving blocks or erasers. They are easier for the beginner.
Fabric types and how to choose them
Not all fabrics print equally well. For crisp, reliable results, choose:
Smooth woven cotton: Tea towels, quilting cotton, pillowcases, and shirts are ideal.
Linen and linen blends: Give a slightly textured, natural look.
Cotton canvas: Great for tote bags and cushion covers.
Lightweight cotton or viscose for scarves: A bit trickier because they shift more, but still good.
Avoid at first:
Stretchy knits like jersey and leggings: They move and distort easily.
Very textured fabrics like fleece or heavy corduroy: Details get lost.
Fabrics with heavy coatings or waterproofing: Paint may not bond properly.
If you are unsure, test on a scrap first.
Tip: If you want the easiest path, buy a small starter set of fabric printing ink or fabric paint in two or three colors you love.
Other essentials
Palette or inking surface
A flat, non absorbent surface where you roll out your ink.
Options: a sheet of glass, a ceramic tile, a plastic tray, or even a piece of smooth plastic folder.
Cutting tools
Linocut which has to be used with a carving knife or suitable cutting tools.
A sharp craft knife helps for trimming edges and cutting straight lines.
Carving block
The actual material you will carve, like soft rubber, lino, or an eraser.
Drawing tools
Pencil: For sketching your design and transferring it to the block.
Fine marker: Optional, to darken guide lines on your block.
Tracing paper: Helpful for flipping designs or planning placement.
Measuring and masking
Ruler: For measuring repeats and placement on fabric.
Masking tape or painter’s tape: For marking registration guides on your table and for taping fabric in place.
Test and support materials
Scrap fabric: Ideally the same type as your final fabric, for testing prints and color.
Scrap paper: To test prints before going to the fabric.
Foam underneath while printing is best, although any paper or fabric will suffice. The foam really grips to intensify the printing though.
Protection and finishing
Protective sheet or plastic tablecloth: To protect your table.
Apron or old clothes and gloves if you like.
Old magazines or cardboard to put inside items such as tote bags or cushion covers to prevent bleed through.
Iron and ironing board or heat proof surface: For heat setting your prints, if required by the paint.
4. Preparing your design
Design is where the fun begins. Simple, bold motifs work best for block printing, especially when you are new.
Bold: Avoid tiny lines and delicate cross hatching at first.
Clear: Make sure the overall shape reads easily from a distance.
Connected: Try to keep details connected to the main shape so pieces do not fall off or break while carving.
Sources of inspiration:
Sketch from real life: Look at a plant, then simplify it into a few basic shapes.
Trace from books or royalty-free images: Simplify as you trace.
Use digital tools: Draw on a tablet and then print your design at different sizes.
Translating a sketch into a block design
Block printing works with positive and negative space.
Positive space: The areas that will be raised on the block and printed with color.
Negative space: The areas you carve away, which will stay the color of the fabric.
Steps:
Draw your design clearly with a dark pen or marker.
Decide: Do you want the motif on a plain background (most common) or on a solid-colored background with the motif cut out in fabric color?
Outline what will stay raised on the block. Everything else will be removed during carving.
Remember your block prints in reverse. If your design includes text or something directional (like an arrow), you must flip it horizontally before transferring it to the block. Tracing paper is useful here:
Trace your design.
Flip the tracing over and rub or draw on the back onto the block, so the reversed version transfers.
Sizing and repeating patterns
Think about your final project:
Scarves and bandanas
Medium sized motifs (3 to 8 cm) repeated in a loose, scattered pattern look nice.
You can also create a border all around the edge with a small motif.
Tote bags
One large central motif looks bold and easy.
Or use a repeating pattern across the whole surface with a smaller block.
Table linens and napkins
Borders at the edge or corners are effective.
An all over neat grid pattern works well if you like a more structured look.
Practical tips:
Print your sketch at the size you think you want, cut it out, and place it on the actual fabric or object to see if it feels right.
For repeats, measure the space. Decide how far apart you want each block, for example every 5 cm horizontally and vertically.
Lightly draw a grid or guide dots on scrap paper to practice the pattern before you move to fabric.
5. Carving or choosing your block
If you enjoy hands-on craft, carving your own block is satisfying. If not, you can absolutely use premade blocks and still create beautiful work.
Safety basics for carving
Always carve away from your hands and body.
Keep the hand holding the block behind the direction of the blade.
Use sharp tools. Dull tools slip more easily.
Work on a stable surface with good light.
Take breaks so your hands do not get tired, which reduces control.
Step by step for carving a simple rubber or linoleum block
Transfer your design
Draw directly onto the block with pencil, or
Use tracing paper to transfer a reversed design. Press firmly so lines show.
Outline key lines
Go over main outlines with a slightly darker pencil or pen so you can see them clearly.
Remove the background first
Use a larger u gouge to carve away big areas of background that should not print.
Keep cuts shallow at first. You can always remove more material.
Carve the details
Switch to smaller tools for fine lines and inner details.
Turn the block instead of your hand when carving curves, so the motion is more controlled.
Frequently brush away crumbs and check that lines are clean.
Test the block
Roll a bit of ink on it and press a test print on scrap paper.
This reveals any raised areas that should be carved away.
Make small adjustments and test again.
Clean up edges
Trim the edges of the block neatly with a craft knife if you like.
This helps reduce accidental marks from the block edges printing.
Using premade blocks
If carving is not your thing:
Buy wooden, rubber, or foam stamps with patterns you like.
Combine small premade motifs to design your own overall layout.
Focus your creativity on color, pattern placement, and layering rather than carving.
6. Preparing the fabric and workspace
Good preparation saves frustration later.
Washing and ironing fabric
Wash new fabric or items first to remove sizing and finishes that can prevent paint from adhering.
Do not use fabric softener before printing.
Dry and iron the fabric so it is smooth. Creases interrupt the print and cause gaps.
Setting up a flat, protected surface
Cover your table with a plastic sheet, oilcloth, or trash bags.
On top of that, place a layer of something slightly soft, such as an old towel, felt, or foam sheet. This gives enough “give” for the block to make full contact with the fabric.
For items like tote bags or cushion covers, slide a piece of cardboard inside to prevent ink from bleeding through to the back.
Use masking tape to:
Secure your fabric so it does not move while you print.
Mark out borders or edges where you do not want paint.
Testing on scrap fabric first
Before you touch your final piece:
Use a similar scrap of fabric to test:
How much ink do you need on the block?
How much pressure to apply?
How the color looks on that particular fabric.
This quick test can save you from over-inked blobs or faint prints on your real project.
7. Printing step by step
Here is the heart of the process.
Rolling out ink or paint
Place a small blob of fabric ink or paint plus textile medium on your palette.
Roll the brayer through the ink, then back and forth in different directions until you have a thin, even layer.
You should hear a quiet, sticky sound and see a smooth, even coating on the roller, with no thick ridges.
Loading the block evenly
Roll the inked brayer gently over the raised surface of the block.
Cover the entire design, but avoid flooding it.
You want an even, thin layer. If it looks thick and shiny, roll some off on the palette and try again.
Test prints on paper and fabric
First press your inked block onto scrap paper. This lets you check coverage and details.
Then test on a scrap of your actual fabric.
Adjust: add more or less ink, or increase the pressure slightly, until you are happy with the result.
Printing a single motif
For something like a central design on a tote bag:
Mark the center of your fabric lightly with a removable pencil or a small marking that will be covered.
Line up the edges or center of your block with that mark.
Lower the block straight down onto the fabric, avoiding sliding or rocking.
Press firmly with your hands, a clean baren (a flat rubbing tool), or the heel of your palm. Apply even pressure across the whole block.
Lift the block straight up to avoid smudging.
Printing an all-over repeat
For repeats such as on tea towels or napkins:
Decide on your spacing and lightly mark guides or use a ruler.
Start at one corner or the center and work in rows to keep alignment.
After each print, re-ink the block lightly. Do not skip re-inking or prints will fade.
Occasionally, wipe any stray ink off the edges of the block to prevent accidental printing.
Registration tips so prints line up
Registration keeps each print in the right place.
Tape down a piece of thin cardboard on your table that fits around your block like a frame. Always place the block snugly into this frame so its position relative to the fabric is consistent.
Lightly draw a grid of lines on scrap paper, place it under thin fabric, and use the lines as a guide.
Use masking tape on your fabric to create a straight edge or margin that you align the block against each time.
What to do if you smudge or misprint
Mistakes happen, especially at the start.
Options:
Accept it as part of the handmade charm, especially on casual items.
Add intentional extras: small dots or marks around the area so the smudge looks like part of the design.
If the error is at an edge, crop the fabric down or fold that section into a seam.
For small surface smudges, very carefully use a damp cotton bud to lift a bit of wet paint, but be realistic: often the best approach is to incorporate the flaw creatively.
8. Curing and fixing the print so it is wash safe
Once your printing is done, the ink must cure.
Follow paint or ink instructions
Check the label on your fabric paint or ink. It will specify:
How long to air dry before heat setting, if needed.
Whether heat setting is required at all.
Any specific temperature or time.
Always let the fabric lie flat and dry fully before moving to the next step. This may take 24 hours or longer, depending on your paint and climate.
Heat setting with an iron
If your product requires heat setting:
Place a thin pressing cloth or scrap fabric over the printed area.
Set your iron to the recommended temperature (often cotton setting, no steam).
Press and move the iron slowly over each area for the time stated, usually 2 to 5 minutes for each section. Keep the iron moving to avoid scorching.
Make sure you evenly cover every printed area.
Some inks can also be heat set in a clothes dryer or oven, but always check the manufacturer’s instructions first and follow safety precautions.
First wash and care tips
After curing and heat setting, wait a couple of days before the first wash if the instructions allow.
Turn the item inside out before washing.
Use cool or warm water, mild detergent, and gentle cycle.
Avoid harsh stain removers on the printed area.
Line-dry when possible, or use a low-heat tumble setting.
Properly cured prints can last a long time and fade gracefully with normal use.
9. Common mistakes beginners make and how to avoid or fix them
Using too much ink
Symptom: Blurry edges, details filled in.
Fix: Use less ink on the palette, roll out further, and apply a thinner layer to the block.
Using too little ink
Symptom: Patchy, faint prints.
Fix: Add a bit more ink and make sure the block is fully loaded.
Pressing unevenly
Symptom: One side of the print is clear, the other is faint.
Fix: Press firmly across the whole block, using both hands, or use a baren or the back of a spoon to rub evenly.
Moving the block while printing
Symptom: Double images or smudging.
Fix: Place the block straight down and lift straight up. Avoid rocking.
Skipping test prints
Symptom: First print on your final fabric is disappointing.
Fix: Always test on paper and scrap fabric first. Adjust ink and pressure.
Choosing overly detailed designs
Symptom: Fine lines disappear or merge together.
Fix: Simplify your design and use thicker lines and shapes, especially at the beginning.
Not washing or ironing the fabric first
Symptom: Paint does not adhere well or cracks early.
Fix: Prewash and iron all fabrics before printing.
Not letting prints dry fully before stacking or ironing
Symptom: Prints transfer onto other fabric surfaces.
Fix: Allow plenty of drying time between layers and do not stack printed fabrics until they are completely dry.
10. Simple project ideas for your first attempts
Here are beginner friendly projects with quick guidance:
Tea towels
Use plain cotton towels and print a simple border of leaves, stripes, or small geometric shapes along one or both ends.
Cushion covers
Start with ready made plain cushion covers. Print a central motif or a loose grid of shapes on the front panel only.
Tote bags
Print a bold central design, or repeat a small motif all over. Remember to place cardboard inside the bag while printing.
Bandanas or scarves
Use lightweight cotton or viscose. Print a small motif along the edges as a border, plus a few scattered inside the center.
Napkins
Print one small motif at one corner of each napkin, or create a simple border along one edge. Keep the design consistent across all napkins for a set.
These projects are small enough to complete in an afternoon and provide good practice in design, placement, and repeating patterns.
11. Conclusion
Block printing on fabric is a satisfying blend of art and craft. It does not require a lot of equipment, it is endlessly customizable, and each print has its own character. Slight imperfections, small shifts in alignment, and variations in color are part of its charm and proof that a human hand was involved.
As you grow more confident, you can experiment with multiple colors, layered blocks, more complex repeats, and different types of fabric. You can refresh old clothes, personalize gifts, and create coordinated sets of home textiles that are unique to you.
The most important step is to start: carve or choose a simple block, gather a small piece of fabric, and make your first print. Every project teaches you something new, and before long, you will have a stack of hand-printed accessories and home pieces that reflect your own style.
About the Author
admin
This is a website that that is passionate about all things hand crafted, including hang made scarves, fishing, and gardening, scrapbooking, and even woodworking.
We have some handy advice and tips, you can read.